
In addition to providing you with access to public, open access corpora and datasets, and conditional access corpora for you to search and analyse, Alveo also allows you to upload your own datasets and optionally make them available for other researchers to access.
Obtaining access
In order to be able to create collections, you must be a Data Owner rather than an ordinary user. To check whether you are a Data Owner, click on your email address in the top-right corner of the page. If you see the menu item Admin in this list, then you already have the ability to create collections and upload data.
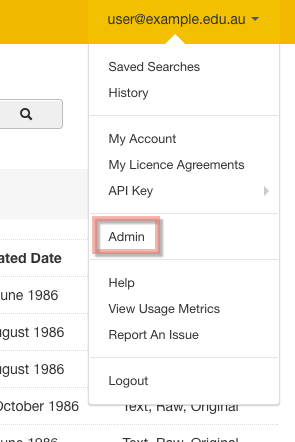
If you don’t see the Admin option, then you have an ordinary user account and you need to send a request to become a Data Owner before you can upload any data. Make a request by sending an email to either Dominique Estival or Steve Cassidy, including the email address with which you are logged in to Alveo (seen from the top-right of the screen), and a little information about your collection: when and how you collected it, what sort of data it contains, what sort of data structure it has, and how large it is. They may then have further questions for you, or may simply grant your request.
Uploading methods
There are two ways to upload your own collections to Alveo: the first is by using the web interface, and the second is by using the Application Programmatic Interface (API). The API is more fully featured and powerful than the web interface, but it is for advanced users who have some background in using a command-line interface and scripting methods. This tutorial will only cover the simpler, but less feature-rich website interface method. For instructions on using the API method, please see the Help Documentation.
Collections, Items and Documents
In Alveo, data is organised into Collections as the highest level or the structure, with Items as a lower level. An item is a single communication event. Items contain files, which can be text, audio, video, etc, which are referred to as Documents, whatever their type. There may be several Documents for a single Item; for example, an audio recording and the text file of its transcription relate to the same communication event, and are both Documents within one Item.
To upload your own data, you’ll first need to create the Collection, then create the Items within that collection, and finally upload the Documents from your computer into the Items.
Metadata
Alveo can support metadata in a number of standardised schemas, as well as any custom metadata fields. When you browse, filter and search Alveo data, you are using the metadata fields specified for the Alveo collections to see only those items that match your search. When creating collections and uploading data into Alveo, you can also specify metadata fields to be used to search, browse and filter your data. As with uploading data, metadata can be added through either the web interface or the API. This tutorial only covers the web interface uploading facility.
Adding metadata is a little more complicated than uploading data, and is described at the end of the tutorial. However, please note that, once uploaded, collections and items cannot be edited using the web interface. This means that, if you are using the web interface, metadata must be added at the same time as the collections or items are created. Metadata can be added later through the API, but this is a more advanced process. For this reason, we suggest reading the entire tutorial first before uploading any data.
Creating Collections
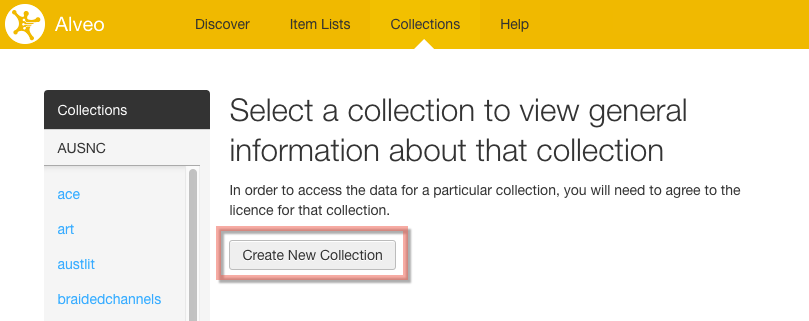
Once you have obtained Data Owner access from the Alveo administrators, you will see different options on some of the Alveo pages. Go to the Collections page, and notice that there is now a button to Create New Collection. Click this.
When creating a collection, you need to provide a few details: the Collection Name, the Collection Title and the Collection Owner. In addition, you can provide a Collection Abstract which is essentially a description of the collection. You also need to decide whether other people will have to ask for your approval to access your data (Private), and which Licence to publish your collection under.
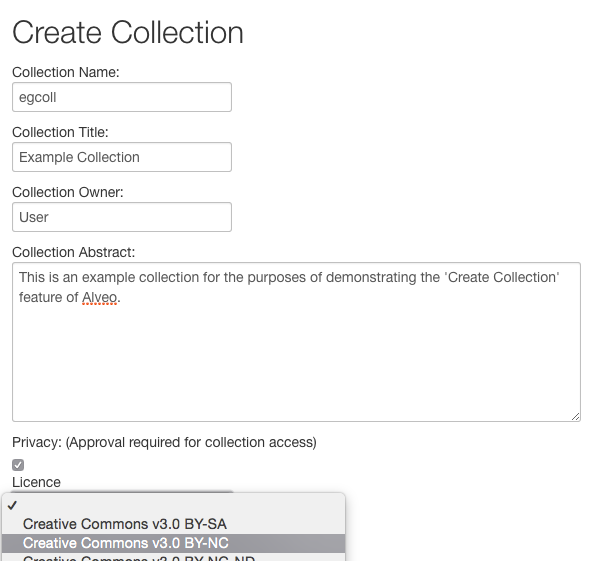
The Collection Name is a short, unique identifier that differentiates your collection from other collections in Alveo. In the example above, the name egcoll will sit alongside cooee, austalk or ace. This name will also be used in URLs for your collection and items, so make sure to pick a name that is very short and descriptive.
The Collection Title is a brief, free-text field to explain what the collection is. The Title can be an explanation of the Name. For example, the Title of the cooee collection is Corpus of Oz Early English. Choose a collection title that is descriptive and fits into just a few words.
The Collection Owner field should contain the name of the person or organisation that owns the materials that you are uploading. If this is you, simply put your own name into this field.
The Collection Abstract is a longer, richer description of the collection which can contain more information about the collection, for instance who collected it, with what sort of equipment, or using what sort of methods, and when. You can be reasonably descriptive in this field, so make sure to include anything that might be relevant to someone else who would read it, as it will help them decide whether to view your collection.
If you want to restrict access to your collection so that other users need to ask for your approval, check the Private box. Lastly, the Licence drop-down menu allows you to select a licence – from a number of Creative Commons licences among others – under which your collection will be published. When accessing your collection, other users will need to acknowledge and agree to the conditions of access as set out by the licence, irrespective of whether the collection is private or not.
Once you have filled in these fields, click Create. You will be taken to the Collection Details page for your collection, and at the top of the page will be a notification telling you that your collection was successfully created. It is now visible to all other users of Alveo from the Collections tab, however they may or may not be able to access it without asking permission from you first, depending on whether you specified Privacy.
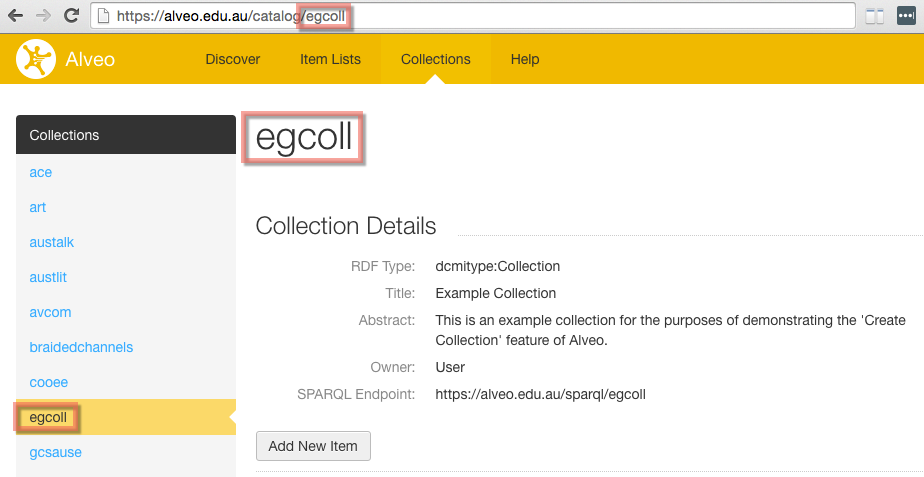
Note that the name chosen in the Name field appears as: 1) an identifier in the collection list on the left, 2) as the title of the page describing the collection, and 3) part of the URL. This is why the Name must be unique, otherwise a user (or the system itself) would not be able to differentiate between collections.
Creating Items
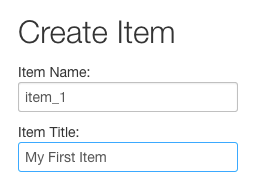
To add an item to your collection, click the Add New Item button. You will be prompted for only two pieces of information: the Item Name and the Item Title. The difference between the two is analogous to the Collection Name and Title: the Name is an identifier used in URLs and item lists, such as item_1, and the Title is a free-text title, like My First Item.
Create as many items as you need for your collection.
Uploading Documents
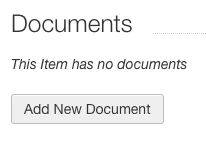
An item may contain just one Document, or it may contain a number of them. Add documents to the item by clicking the Add New Document button.
The Add Document screen has a button to select a file from your computer. Click this, and the browser will open a file selector window. Navigate to the file you wish to add to this Item, and choose Open or OK depending on your operating system.
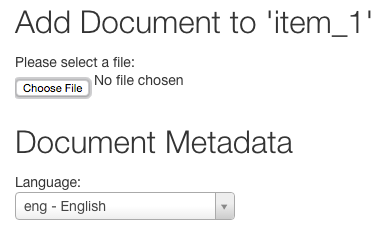
You will also be prompted to choose a language for the Document. This language ID (from the standard list of ISO 639-3 codes) will populate a field in the Item metadata and will be searchable via the facets in the Discover tab.
Repeat these steps as many times as you need to create Items in your collection and populate them with Documents.
Metadata
Metadata can be added to any Collection, Item or Document that you create or upload. Using the web interface, metadata can only be added at the time of creation or upload, but the API can be used to edit existing collections, items and documents. Alveo supports a number of standard schemas, and recognises a large number of metadata elements from these schemas. This tutorial will cover one of the most widely used standard metadata schemas: Dublin Core.
Dublin Core (DC) is a metadata schema developed and maintained by the Dublin Core Metadata Initiative (DCMI). It is a small set of vocabulary terms that can be used to describe published web resources such as audio and video recordings, images, and text documents. As such, DC is highly suitable for describing the sorts of data that would be uploaded into Alveo. There are other supported schemas that may be more suitable for some types of data, such as the Open Language Archives Community (OLAC), but this tutorial will use Dublin Core as an example.
Namespaces
As there is a large number of different metadata standards in use in different systems in the world, it is highly likely that an element name will be reused in several schemas. Consider a possible metadata element like title. Depending on who is using it, title could mean a number of different things. Many people might interpret this as a name, as in the title of a song or a book. Others might interpret it as a prefix in a person’s name, such as Dr or Ms.
Namespaces are used to disambiguate between different metadata elements that might have the same name in two different schemas. Namespaces are indicated by a prefix on the metadata element specifying the metadata schema that the element comes from. The namespace prefix for Dublin Core is dc. So the metadata element dc:title is the title of the resource according to the interpretation of the term title by the Dublin Core Metadata Initiative.
Adding Metadata
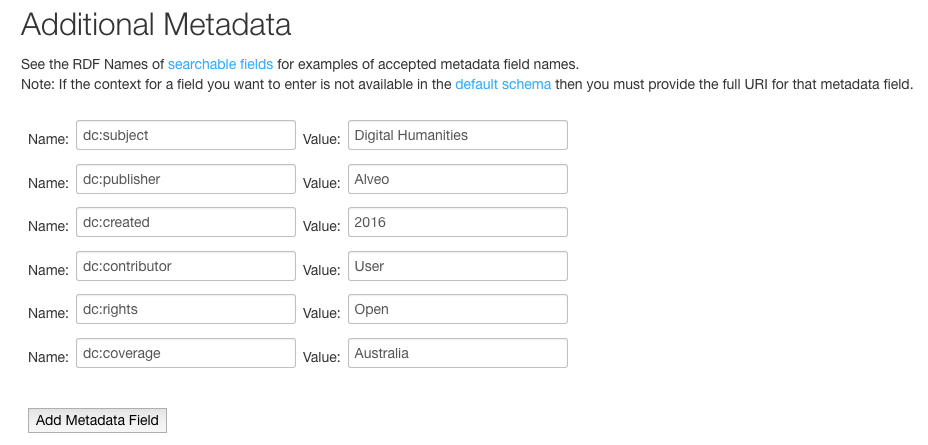
To add metadata to a collection, item or document, click the Add Metadata button under the heading Additional Metadata and notice that two additional fields appear: Name and Value.
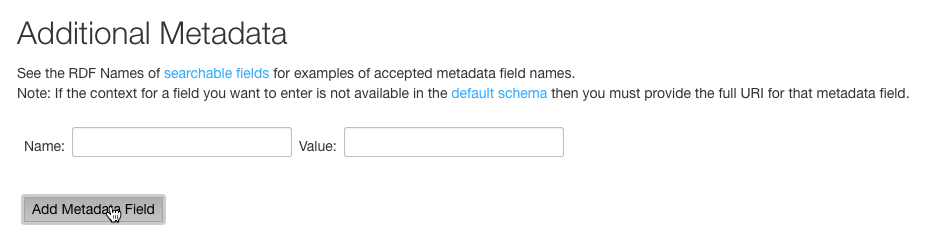
The Name field will contain the metadata element including its namespace prefix, while the Value field will contain the value for that metadata element. The screenshot below for example, shows how you would enter a creation date, using the Dublin Core element created, of 2014.

Repeat this for as many metadata elements that you wish to include, however make sure that the element names are spelled correctly, and also make sure you only include one entry for each element, otherwise only the last will be recorded.
The table below contains the full list of DC elements you can use for your data with a description of each from the Dublin Core website.
| Element | Description |
|---|---|
| dc:title | A name given to the resource |
| dc:creator | An entity primarily responsible for making the resource |
| dc:subject | The topic of the resource |
| dc:description | An account of the resource |
| dc:publisher | An entity responsible for making the resource available |
| dc:contributor | An entity responsible for making contributions to the resource |
| dc:created | Date of creation of the resource |
| dc:type | The nature or genre of the resource |
| dc:source | A related resource from which the described resource is derived |
| dc:coverage | The spatial or temporal topic of the resource, the spatial applicability of the resource, or the jurisdiction under which the resource is relevant |
| dc:rights | Information about rights held in and over the resource |
If you are interested in using other metadata schemas such as OLAC, please see this list of metadata elements supported by Alveo. If a metadata element or schema is not supported, you can still add it to a collection or item, but you must provide the full URI for that metadata element. If you do not know the full URI of the element, we strongly suggest you limit yourself to the metadata already supported by Alveo.
Viewing and searching Metadata
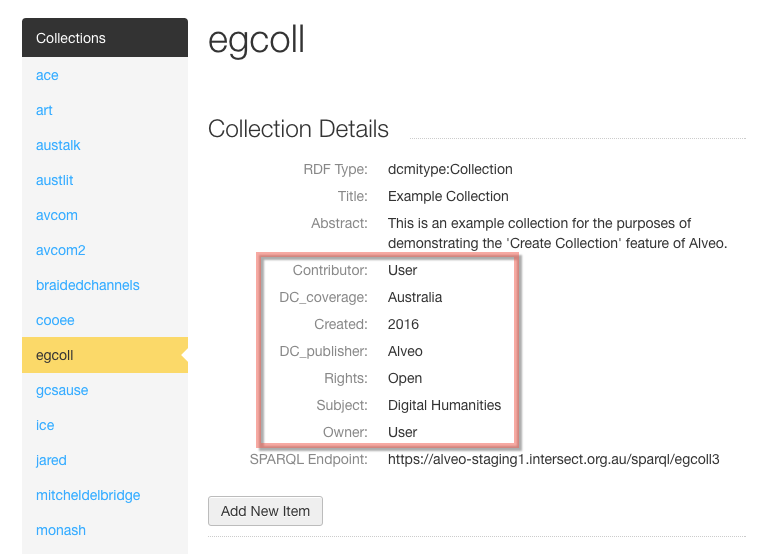
When you have created collections and items with metadata, these additional descriptions will be visible to you from the Discover tab, and you will be able to use these to search across your data using the Advanced Search function (as described in Part 1 of the Introduction to Alveo tutorial). Collection-level metadata is visible on the Collections tab, and if you checked the Privacy box when creating the collection, this metadata will provide the users with a means to evaluate whether they should ask for permission to access the collection.
Item-level metadata is visible underneath the Document Display area when viewing an item.
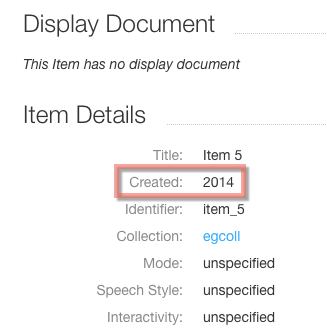
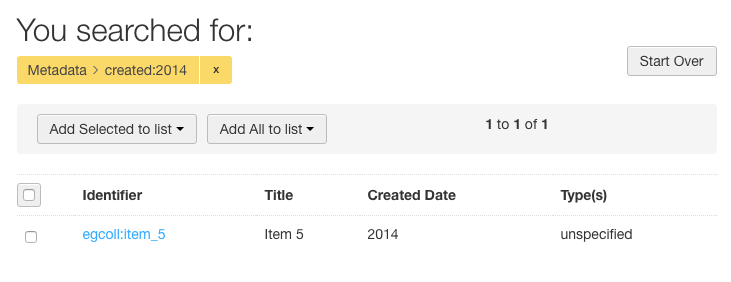
When searching these metadata elements, the search term to use is the metadata element name without the namespace identifier. That is, when searching for the item above with the additional metadata for dc:created, you would search using the term created, as shown below.
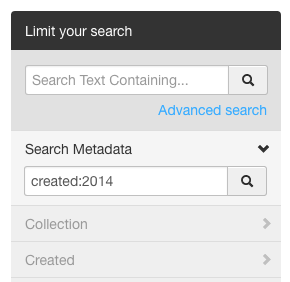
The search results will be displayed exactly the same as results for any other search of metadata, or faceting using filters from the left sidebar, as demonstrated in Part 1 of the Introduction to Alveo tutorial. After searching for your custom metadata, you can remove the search term by clicking the x, you can remove all filters and searches by clicking Start Over, or you can further narrow your search set by filtering or searching further.
Summary
The upload function of Alveo allows you to create collections and items, and populate them with documents, and describe them with metadata using a number of standard schemas, or indeed any schema you prefer. This tutorial only covers the web interface to perform these functions. The API is more fully featured and can be used to edit existing collections and items, and modify metadata, however it is for users who have experience using the command line and programming interfaces. If you wish to experiment with the API, please read the documentation here.